Ever wanted to capture what’s happening on your Mac screen—maybe a tutorial, a gameplay moment, or an important meeting—but weren’t sure where to start? You’re not alone. Many users search for how to screen record on Mac because Apple actually offers multiple built-in ways to do it without installing extra apps.
In this guide, you’ll learn simple, reliable methods to record your screen, capture audio, and save high-quality videos using macOS tools. Whether you’re a beginner or just need a quick refresher, this breakdown makes everything easy to follow.
Understanding Built-in Screen Recording on Mac
If you’re wondering about how to screen record on Mac, the good news is that Apple already includes powerful tools inside macOS.
There are two main methods:
- Screenshot Toolbar (fast and modern)
- QuickTime Player (classic and reliable)
Both options allow you to capture your entire screen or just a selected portion. They’re free, lightweight, and already installed on your device.
This means you don’t need third-party apps unless you want advanced editing features.
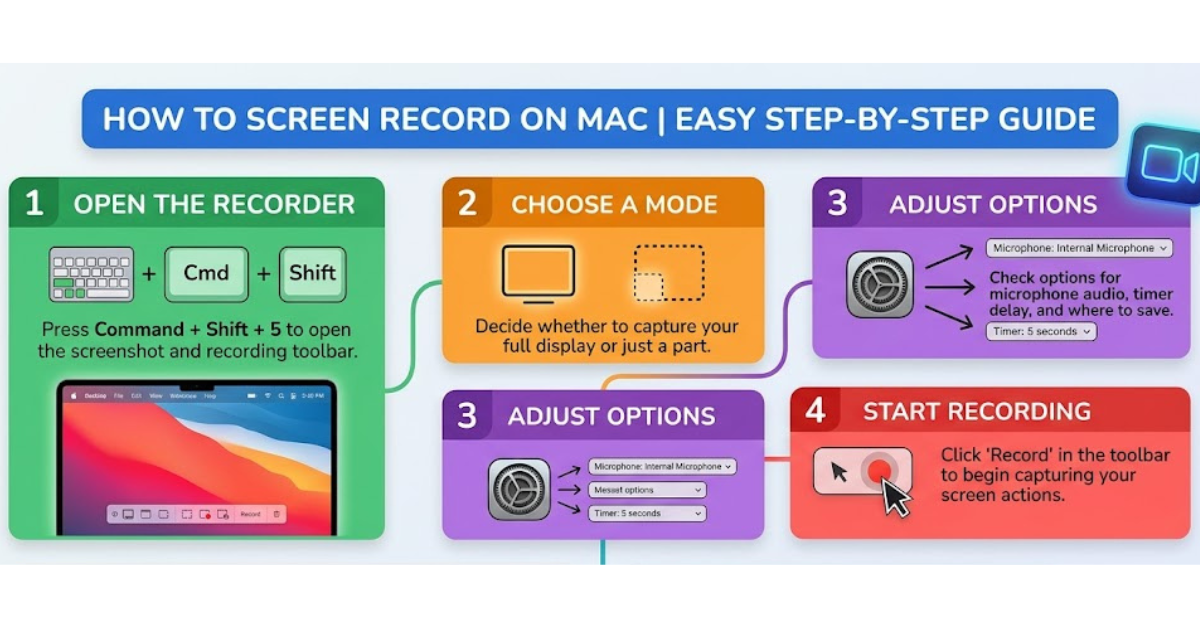
Method 1: Screenshot Toolbar Fastest Way
One of the easiest ways for how to screen record on Mac is using the Screenshot Toolbar introduced in macOS Mojave and later.
How to use it:
- Press Command (⌘) + Shift + 5
- A control bar will appear at the bottom of your screen
- Choose:
- Record Entire Screen
- Record Selected Portion
- Click Record
To stop recording, click the Stop icon in the menu bar.
Why this method is popular:
- Quick access with a shortcut
- No app switching needed
- Built-in editing options after recording
This is ideal for tutorials, presentations, or quick captures.
Method 2: QuickTime Player Classic Option
Another reliable way for how to screen record on Mac is through QuickTime Player, which has been around for years.
Steps to record:
- Open QuickTime Player
- Click File > New Screen Recording
- Click the red record button
- Select full screen or drag to choose an area
- Click to start recording
To stop, press the Stop button in the menu bar.
Advantages of QuickTime:
- Works on older macOS versions
- Allows basic trimming after recording
- Stable and simple interface
It’s especially useful if your Mac doesn’t support newer shortcuts.
Recording Audio Along with Screen
Many users searching for how to screen record on Mac also want to include sound—whether it’s voice narration or system audio.
Here’s how you can do it:
- Before recording, click Options in the Screenshot Toolbar
- Select a microphone (built-in or external)
- Adjust volume levels for clear audio
If you’re using QuickTime, choose the microphone from the dropdown before starting.
Pro tip:
Use headphones with a mic to reduce background noise and improve clarity.
Saving and Editing Your Recording
After figuring out how to screen record on Mac, the next step is managing your video.
Once you stop recording:
- The file is automatically saved on your desktop (default setting)
- You can rename it immediately
- Open it in QuickTime or iMovie for basic editing
Simple edits you can do:
- Trim unwanted sections
- Adjust playback speed
- Export in different resolutions
These built-in tools are perfect for quick content creation without extra software.
Common Problems and Fixes
Even though how to screen record on Mac is straightforward, users sometimes face issues:
1. No sound recorded
- Check microphone permissions in System Settings
- Ensure correct input device is selected
2. Recording not starting
- Restart Screenshot Toolbar (⌘ + Shift + 5 again)
- Close conflicting apps
3. Low-quality video
- Free up storage space
- Record in full screen for better resolution
Key Takeaways
- Mac has built-in tools for screen recording
- Screenshot Toolbar is the fastest method
- QuickTime is great for compatibility and simplicity
- Audio recording requires selecting the correct microphone
- Files are automatically saved and easy to edit
FAQ: How to Screen Record on Mac
1. Can I screen record on Mac without downloading software?
Yes, macOS includes built-in tools like Screenshot Toolbar and QuickTime Player, so you don’t need third-party apps.
2. Where do screen recordings save on Mac?
By default, recordings are saved on your desktop, but you can change the location in Screenshot Toolbar options.
3. Can I record internal audio on Mac?
Mac doesn’t natively support internal audio recording, but you can use third-party audio routing tools if needed.
4. How long can I record my screen on Mac?
There’s no strict time limit—your recording duration depends on available storage space.
5. Why is my screen recording lagging?
Lag usually happens due to low system memory or heavy background apps. Closing unused programs can help.
Conclusion
Learning how to screen record on Mac is simpler than most people expect. With just a few shortcuts or QuickTime steps, you can capture high-quality videos in seconds.
Whether you’re creating tutorials, saving online meetings, or sharing gameplay, Mac’s built-in tools are more than enough for everyday use. Try both methods and stick with the one that fits your workflow best.